Knowledge base

Managing discounts on quotes and invoices

Toolcie allows you to manage discounts and other price reductions on your quotes and invoices in several different ways.

You can add discounts per line/entry, but also by group of entries (overall discounts).

The discount always includes two fields:

  • the type of discount: percentage or fixed amount
  • the value of the discount

How do I add a discount to a line item?

To add a discount when creating an entry, just click the Checkbox “Discount” checkbox, then complete the fields described above.

For a line/entry that’s already been created, click on the contextual menu Contextual menu to add the discount.

How do I add a discount to a group of items?

If you want to add an overall discount or a discount to a group of items, click on the “Add” Add button button, then on the “Discount” Discount button button.

If you want to apply a discount to the total amount of the document after taxes, choose the "Fixed amount" discount type, and then from the dropdown menu, select "Tax incl.".

You also have the option to apply the discount to a specific set, such as a subgroup, or for example, after a subtotal. To do this, use the toggle button "Apply to the total amount of entries" Toggle button to deactivate the option. Once the discount is inserted, move it to apply it to the desired position.
Link to this article: https://toolcie.com/en/support/k/managing-discounts-quotes-and-invoices

How do I do a bulk export with invoices or quotes?

Toolcie allows you to do a bulk export of your invoices or quotes.

To export invoices or quotes, in the corresponding section, check the boxes Checkbox for the documents that you want to export, then click on the export button Export button.

If you exported to CSV format, you must open the file in a spreadsheet program like Microsoft Excel or Google Sheets as a comma-separated values (CSV) file.

Link to this article: https://toolcie.com/en/support/k/how-do-i-do-bulk-export-invoices-or-quotes

Understanding the operation of quote and invoice numbering

Operation

Toolcie manages document numbering differently in draft and final modes.

When creating a new document, a provisional reference number is assigned.

Upon finalizing the document (status change, sending, downloading, etc.), the definitive reference is generated.

How to modify numbering?

It is possible to modify the numbering for quotes and invoices for future documents.

It is also possible to modify the numbering specifically for each document.

How to modify the reference number?

When is the definitive reference generated?

The definitive reference is generated when the document's status changes to a status other than "Draft."

How to obtain the definitive reference?

You can obtain the definitive reference of the document by performing the following operations:

Link to this article: https://toolcie.com/en/support/k/understanding-operation-quote-and-invoice-numbering

Why is reCaptcha asking me to complete a puzzle too often?

reCaptcha, developed by Google, is an essential tool to protect websites and applications from suspicious activities performed by robots or automated bots. Toolcie uses the invisible version of reCaptcha, which aims to make the user experience smoother by avoiding users to fill out forms or check boxes. However, some users may encounter issues where reCaptcha frequently asks them to complete a puzzle. In this article, we will explore the possible causes of this behavior and provide solutions to minimize these repetitive requests.

1. Use of VPN or Proxies

The use of VPN or proxies can be one of the main reasons why reCaptcha frequently asks to complete a puzzle. These tools modify the user's IP address, which can be interpreted as suspicious activity by reCaptcha. If you are using a VPN or proxy, try temporarily disabling them to see if it resolves the issue.

2. Suspicious Browsing History or Previous Activities

reCaptcha relies on various factors to determine if a user is a human or a bot. If your browsing history is considered suspicious or if you have performed suspicious activities on other websites and applications, reCaptcha may be more strict in asking you to complete a puzzle frequently. Also, avoid clearing your browsing history too frequently or using private browsing sessions as it can prevent reCaptcha from having the necessary information to evaluate your activity and may result in repetitive requests to complete a puzzle. In such cases, ensure that your browsing history is clean by avoiding visiting malicious websites or using suspicious browser extensions.

3. Rapid or Unusual Browsing Activity

If you are navigating quickly through the application or if your browsing actions are deemed unusual, reCaptcha may ask you more frequently to complete a puzzle to confirm that you are a legitimate user. Try to navigate in a more regular manner and avoid excessive or rapid clicking.

4. Blocking cookies, scripts, or ad blockers

Cookies, scripts, and ad blockers can also have an impact on the functioning of reCaptcha. If you have blocked cookies, scripts, or have an ad blocker enabled in your browser settings, it may result in frequent requests to complete a puzzle. Ensure that cookies and scripts are enabled for the Toolcie application to facilitate reCaptcha validation.

Additionally, if you are using an ad blocker, it may interfere with the elements necessary for the proper functioning of reCaptcha. In such cases, you can try temporarily disabling your ad blocker to see if it resolves the issue.

5. Try using a different browser or device

If you are still experiencing issues with reCaptcha, and the previously mentioned solutions haven't resolved the problem, you can try using a different web browser or device. Sometimes, specific browser configurations or extensions can interfere with the functioning of reCaptcha. By using a different browser or trying with another device, you can determine if the problem is related to a specific configuration of your browser or device. This can help you identify the source of the problem and find an appropriate solution.

Link to this article: https://toolcie.com/en/support/k/why-recaptcha-asking-me-complete-puzzle-too-often

Why is the total amount including tax not displayed?

If your quote or invoice does not show the total amount including tax, check the following points:

1. Activation of tax management at the application level

Make sure you have enabled tax management through the main menu: "Settings > Taxes".

Once activated, add at least one tax.

2. Activation of tax management at the document level

Verify that you have enabled tax management in your quote or invoice.

To do this, in document editing mode, click on the contextual menu Contextual Menu and then click on the "Settings" button Settings Button.

3. Verification of entries in the document

Verify that your different entries such as items and custom entries have a tax specified.

Link to this article: https://toolcie.com/en/support/k/why-total-amount-including-tax-not-displayed

How to accept online bank transfer payments?

The advantages of online bank transfer payments

Toolcie allows its users to accept online bank transfer payments through an integration with Stripe, an online payment platform. This payment method offers several advantages:

  • Customers or businesses can use bank transfers to send money directly to your bank account.
  • This payment method is frequently used for high-value inter-business payments.
  • The process is 100% automated, which means payment collection and invoice status changes happen automatically.

Supported bank transfer solutions

Toolcie supports several bank transfer solutions, including:

  • SEPA Bank Transfer for the European Union
  • ACH Bank Transfer for the United States and Canada
  • UK Bank Transfer for England
  • Sofort for the European Union
  • Bancontact for Belgium
  • iDEAL for the Netherlands

Other solutions can be added based on users' needs.

How to enable online bank transfer payment

To enable online bank transfer payment with Toolcie, follow these steps:

  1. Add or modify your current payment method from your invoice in edit mode.
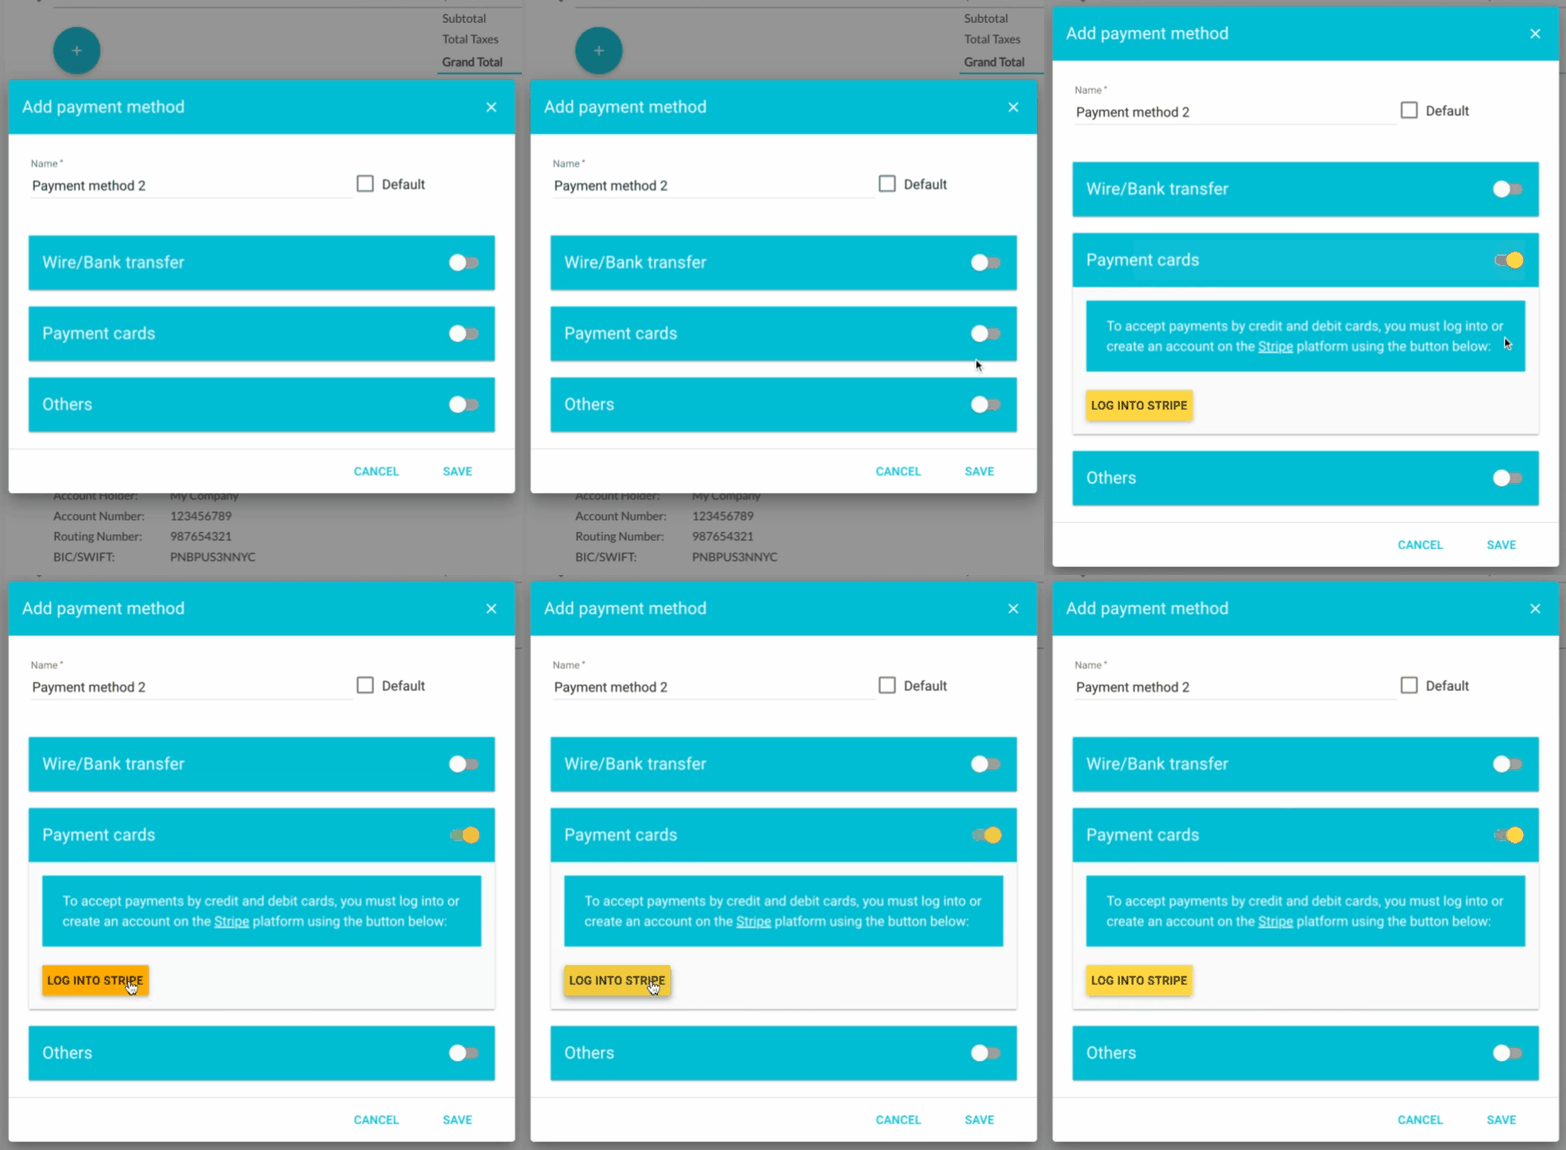
  2. Enable "Online Payment" mode. This setting is also available from the main menu "Settings > Payment methods".
  3. Upon activation, you'll need to sign in or create an account with Stripe, our payment partner.
  4. Once your Stripe account is connected, you can enable the desired payment method, such as SEPA or ACH, through your Stripe account.

How to send the invoice to the customer

Once the payment method is enabled, you can send the invoice to the customer via email through the application. The email will contain the direct link for online payment. You can also retrieve this payment link by sharing the invoice or copying the link displayed in the invoice under the "Payment Information" section.

Verifying payment mode activation

Once the Stripe payment method is properly configured and enabled, you should see the "Pay" button appear on the invoice. The customer can click this button to make the online bank transfer payment.

It's important to note that bank transfers may take a few business days to process, and processing times may vary depending on the banks involved. You'll need to wait a few days for the payment to be collected in your bank account.

In conclusion, accepting online bank transfer payments is a quick and convenient payment method for customers and businesses. With Toolcie, you can easily enable this payment method and send invoices to your customers for quick and automatic collection. Don't forget to verify that your Stripe account is properly configured to accept bank transfers and inform your customers of this convenient payment option.

Link to this article: https://toolcie.com/en/support/k/how-accept-online-bank-transfer-payments

How do I accept payments by payment card?

You can give your customers the option to pay you directly online by payment card. To do so, while in editing mode for your invoice, add or modify the selected payment method, activating “Online payment”.

This setting is also available from the main menu “Settings > Payment methods”.

Payment card activation

Once the payment method has been updated, you can send the invoice to the customer by email through the application. The email will contain the direct link for online payment. You can also get this payment link by sharing the invoice or by copying the link displayed on the invoice in the “Payment information” section.

If the Stripe payment method is properly configured and activated, you should see the “Pay” button Pay online button appear.

Link to this article: https://toolcie.com/en/support/k/how-do-i-accept-payments-payment-card

How to accept installment payments?

Installment payment, also known as "Buy now, pay later", is a payment method that allows merchants to sell their products to customers who wish to pay in multiple installments. This option enables your business to receive the full payment immediately, while your customer pays only a portion or nothing at all at the time of purchase. The process is 100% automated. Payment collection and invoice status change are done automatically.

Supported solutions

Several installment payment solutions are supported by our invoicing software, Toolcie, including:

  • Klarna
  • Afterpay / Clearpay
  • Affirm

Note that "Buy now, pay later" methods offered are only supported for consumers and not for businesses.

How it works

The customer receives the invoice and fills in their information online. Once the payment is made, the customer is notified by email, and a notification is sent to the business.

How to activate this payment method

Here are the steps to activate "Buy now, pay later" on Toolcie:

  1. Add or modify your current payment method from your invoice in edit mode.
  2. Enable the "Online Payment" mode.
  3. This setting is also available from the main menu "Settings > Payment methods".
  4. When activated, you will need to sign in or create an account with Stripe, our payment partner.
  5. Once your Stripe account is connected, you can activate the desired payment method, such as Klarna, Afterpay, through your Stripe account.

How to send the invoice to the customer

Once the payment method is updated, you can send the invoice to the customer via email through the application. The email will contain the direct link for online payment. You can also retrieve this payment link by sharing the invoice or copying the link displayed in the invoice under the "Payment Information" section.

How to verify that the payment method is activated

If the Stripe payment method is properly configured and activated, you should see the "Pay" button.

Link to this article: https://toolcie.com/en/support/k/how-accept-installment-payments

How to cancel my subscription?

You can cancel your subscription at any time.

To do so, use the main menu "Settings > Subscription" and go to the "Settings" tab. Once in the settings, use the contextual menu Contextual menu to cancel your subscription.

Link to this article: https://toolcie.com/en/support/k/how-cancel-my-subscription

How do I change the reference numbers of quotes and invoices?

If you want to change the format of the reference number for future quotes and invoices, go to “Settings > Quotes/Invoices” from the main menu.

The field “Reference number format” allows you to modify the reference number. You can use different tokens that will then be replaced by the correct values. Examples: Reference ID, day, month, etc. You can preview the final result just below the field.

It is also possible to choose whether reference numbers reset monthly, yearly or never.

Both annual and monthly resets will have to use a reference number format with the [year] token, and monthly resets will also need the [month] token.

If you want to modify the reference for a specific quote or invoice, you can also do so while editing the document by clicking on the contextual menu Contextual menu then on the settings button Settings button.

If your company is subject to France’s VAT fraud prevention law, you cannot modify the reference number format for invoices. If needed, you can create a ticket via the support center and we will handle the modification.

Link to this article: https://toolcie.com/en/support/k/how-do-i-change-reference-numbers-quotes-and-invoices
YouTube video

Modifying an item on a quote or invoice

When adding a product or service to a quote or invoice, you have the option to modify it at any time.

There are different ways to modify the item :

  1. on the document itself
  2. in the database of items

Modifying the item on the document itself allows you to replace certain fields like the price, discount, name, description or unit of the item, without these edits impacting the item in the database.

Modifying an item in the database, meanwhile, allows you to modify the item both on the document and in the database of items. As a result, this will also modify your other documents not yet finalized that use the same item.

To modify a product or service on a document or in the database, click on the contextual menu Contextual menu on the right of the line item.

You can go back at any time and reset the modification made to an item in a document by clicking the reset button for the field Reset product button.

Link to this article: https://toolcie.com/en/support/k/modifying-item-quote-or-invoice
YouTube video

Calculating margins and managing costs

Toolcie allows you to assign costs for each of the entries on your quotes and invoices. The costs correspond to your expenses incurred. For example, for a product, the cost may correspond to the purchase price tax excluded, packaging expenses or delivery expenses.

Assigning costs allows the software to automatically calculate the margin and its margin rate. The margin in Toolcie corresponds to the total tax excluded, minus costs. The percentage of margin is the same as the “markup” in technical terms.

How do I assign the cost for an item or for a custom entry?

To assign the cost or calculate the margin for a product, service or custom entry, check the “Checkbox Calculate margin” box when adding or editing the item.

You can complete the “Cost” field and the “Margin as %” field. The “Price”, “Cost”, and “Margin as %” fields are linked. Completing two of these fields will automatically fill the third.

You can link or unlink the “Price” and “Cost” fields by clicking the button located on the right Button associate price and cost. When the two fields are linked, any change to one of the two fields will automatically result in a modification in the second based on the margin rate.
This option is just an aid for filling in the fields. It is not saved in a database.

Managing fees and costs

When creating quotes and invoices, you can add fees that are visible to the customer. The software interprets these fees by default as costs that affect the margin.

For each fee, you have the option to indicate that it should be treated as income by checking the “Checkbox Treat as income” box. When the box is checked, the fee will be treated as having a margin of 100%.

An additional box that can be checked, “Checkbox Cost”, allows you to assign the cost associated with the fee. The cost can be set as a percentage or as a fixed amount.

Display of the margin and its margin rate

The margin and its margin rate are shown on quotes and invoices in editing mode for each entry. The overall margin is shown below the total amount for each group.

The margin also appears on the pages listing all documents, as well as on the Toolcie dashboard. You can also see the total margin earned per customer and per product.

Link to this article: https://toolcie.com/en/support/k/calculating-margins-and-managing-costs
YouTube video

How bundles of items work

You can create bundles of items, also called bundles of products and services.

These bundles can be used in your quotes and invoices.

There are two ways of adding a bundle to a document:

  • Inserting just the bundle’s items
  • Inserting the bundle with its items

These two actions are very different and must be understood before using them.

Inserting just the bundle’s items

With this action, when adding a bundle to a quote or invoice, only the items in the bundle will be added. The bundle itself will not be added to the document. This action should be used to save time if you regularly have to add several of the same items to documents.

Inserting the bundle with its items

With this action, when the bundle is added to a document, it will appear as a single line item with the bundle and the items it contains. This action should be used if you want to offer a product or an item made up of sub-items. This type of bundle allows you to set a new price for the group of sub-items.

The bundle remains modifiable once added to the document. 

The bundle only controls the tax on the bundle itself. As such, it is recommended that you only add items subject to the same tax to a bundle.

Creating a bundle of items

A bundle of items can be created the same way that a standard item is added. When creating the item, select the type “Bundle”, then select the items that make up the bundle.

Link to this article: https://toolcie.com/en/support/k/how-bundles-items-work

How do I change the status of an invoice or quote?

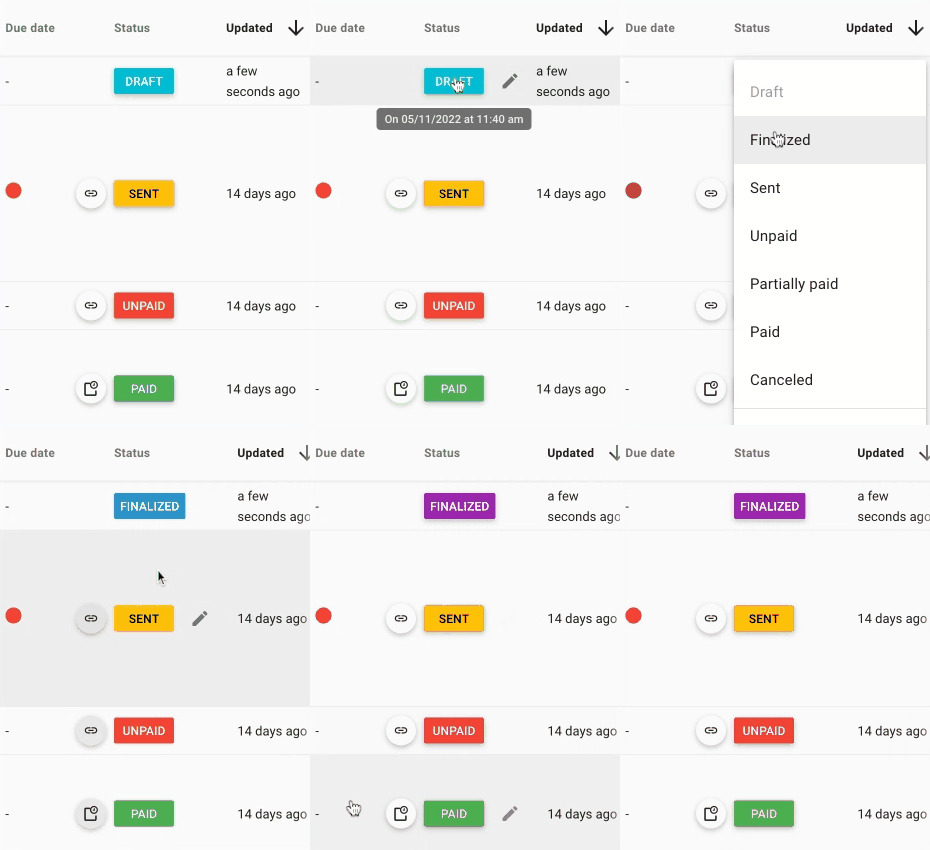
At any time, you can manually change the statuses of your documents, including canceling an invoice, changing its status to sent, or adding confirmed status to a quote.

To do this, go to the page listing your documents, then click on the color-coded label indicating the document’s status. When you click on it, you can select a new status.

Change the status of an invoice or quote

Link to this article: https://toolcie.com/en/support/k/how-do-i-change-status-invoice-or-quote

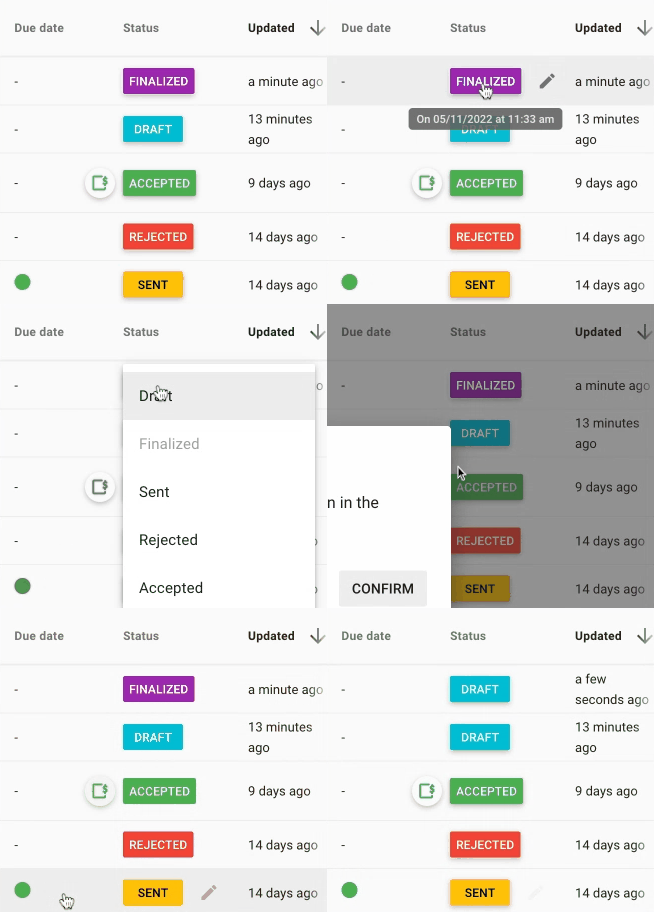
How do I modify an invoice or quote that’s been finalized?

A document in a status other than “Draft” cannot be modified.

However, you can change the status back to “Draft” by clicking the current status, then selecting “Draft”. Once this is done, you will be able to once again edit the document.

Note that companies subject to France’s VAT fraud prevention law cannot modify an invoice once it’s finalized.
In that case, you can cancel the invoice then create a new one by duplicating the old invoice using the contextual menu Contextual menu located to the right on the page listing all invoices.

Change status to draft mode

Link to this article: https://toolcie.com/en/support/k/how-do-i-modify-invoice-or-quote-thats-been-finalized

How do I add or remove units of measure on quotes and invoices?

You can add or remove the units of measure of your choice directly in editing mode for a quote or invoice by clicking “Manage” at the bottom of the units list. You can also access this setting directly from the main menu “Settings > Units”.

Add a unit of measure

Link to this article: https://toolcie.com/en/support/k/how-do-i-add-or-remove-units-measure-quotes-and-invoices

The software’s compliance with VAT fraud prevention law

Toolcie complies with VAT fraud prevention law (Article 286 of the
French General Tax Code).

The software complies with the four main criteria, which are:

  • Data unalterability
  • Data security
  • Data preservation
  • Data archiving

What do I need to do to activate this option in the software?

The software automatically activates the feature to ensure compliance based on the following criteria:

  • If the company is based in France
  • And if the tax system is activated

Finalizing and obtaining certification

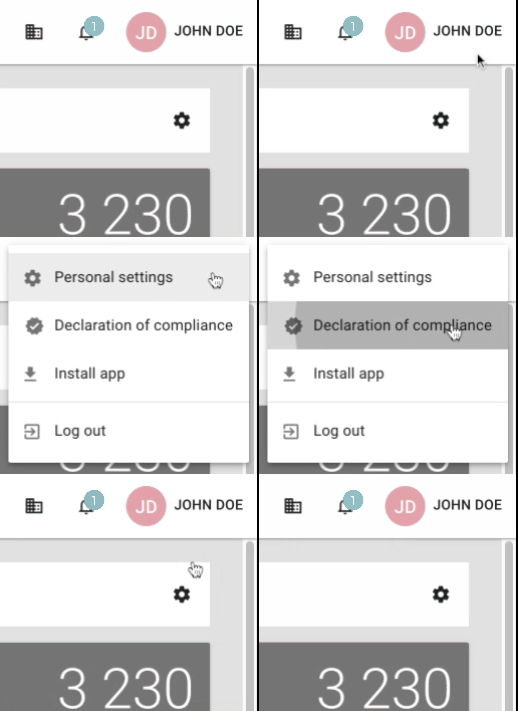
The business owner must download the individual declaration and sign it to comply with the law. You can obtain this document via the user menu at the upper right of the software.

Certificate of compliance with the VAT anti-fraud law

Link to this article: https://toolcie.com/en/support/k/softwares-compliance-vat-fraud-prevention-law

How do I create a deposit or balance invoice from a quote?

Toolcie allows you to create invoices from a quote. Invoices can be for deposits, balances, or totals.

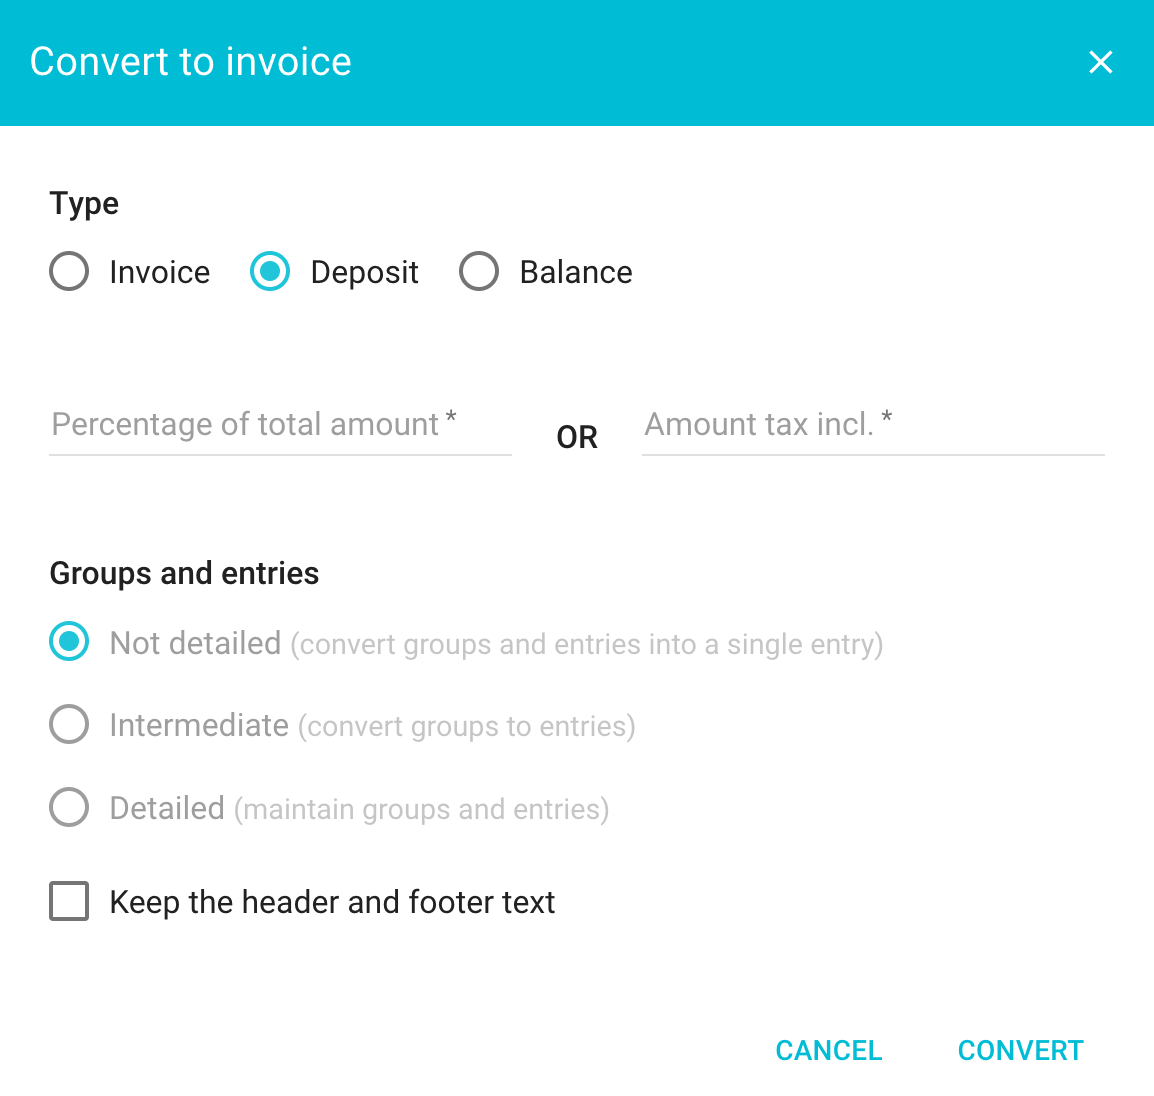
To do this, go to the page listing all quotes and estimates, then click on the contextual menu located on the right Contextual menu then click “Convert to invoice” Convert a quote to an invoice.

When converting a quote to a deposit or balance invoice, you must indicate the percentage of the total amount or the desired total amount tax included.

Convert a quote into a deposit, balance or total invoice

Link to this article: https://toolcie.com/en/support/k/how-do-i-create-deposit-or-balance-invoice-quote

Managing invoice reminders

How invoice reminders work

When an invoice is in “Sent” status, the due date automatically appears on the page listing all invoices in a visual format Due date of quotes and invoices.

When you hold the cursor over it, the number of days remaining before the due date appears. Toolcie sends an automatic notification to the invoice creator on the due date.

You can create an invoice reminder at any time to send to the customer. The invoice reminder feature creates a new “Reminder”-type invoice containing all of the information from the original invoice.

Once the reminder invoice has been sent, the original invoice status will move to “Unpaid”. The reminder invoice will then take its place. You can generate as many reminders as you like. Generating a reminder can be done via the original invoice or via a reminder invoice.

The “Display linked invoices” button appearing on the page listing all invoices Button to display linked invoices allows you to show the original invoice and the linked reminder invoices. This button automatically appears when invoices are linked together.

All default settings for reminders (such as fees, the due date, and text, particularly for email) can be found via the main menu in “Settings > Invoices”, then on the “Reminders” tab.

How to create a reminder invoice

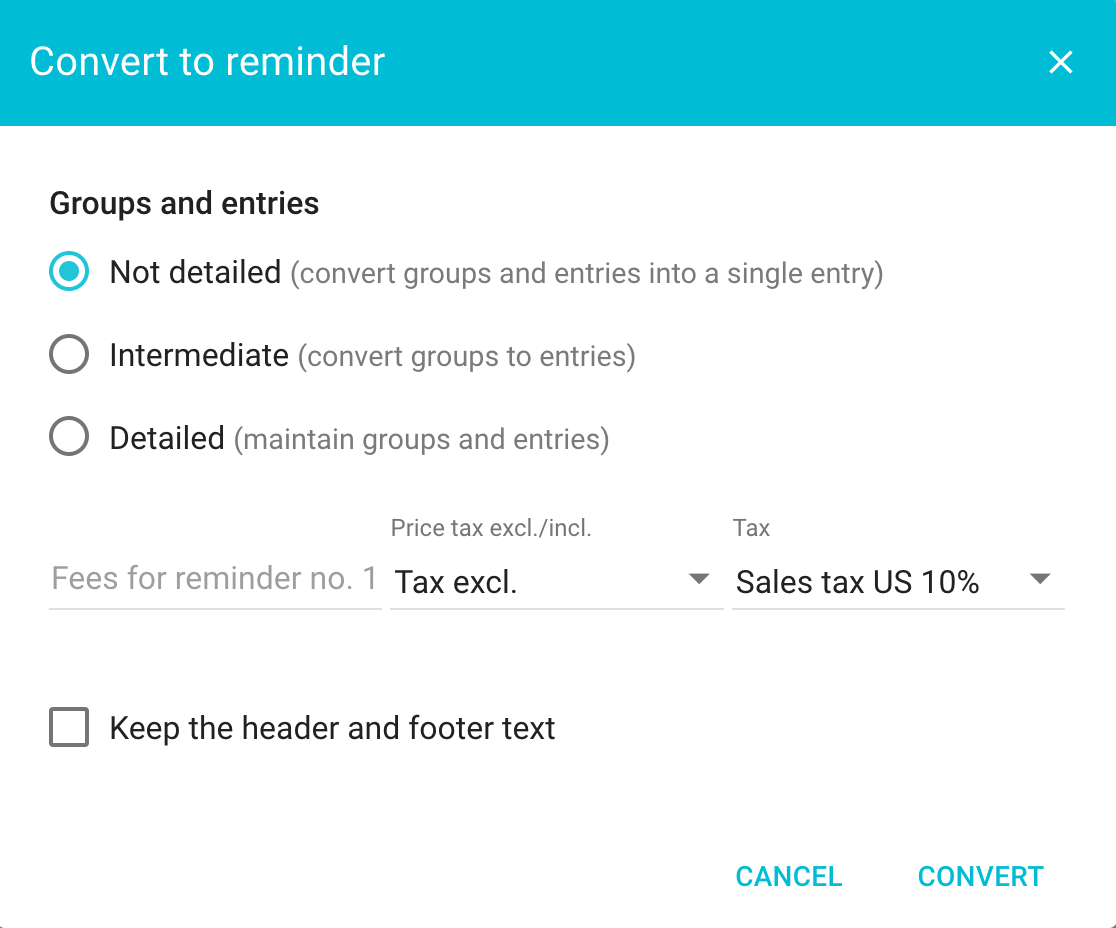
To convert an invoice to a reminder, on the page listing all invoices, click on the contextual menu located on the right Contextual menu then click “Convert to reminder” Invoice reminder icon.

When converting, you can indicate reminder fees.

Convert an invoice into a reminder

Link to this article: https://toolcie.com/en/support/k/managing-invoice-reminders

How do I create a credit note?

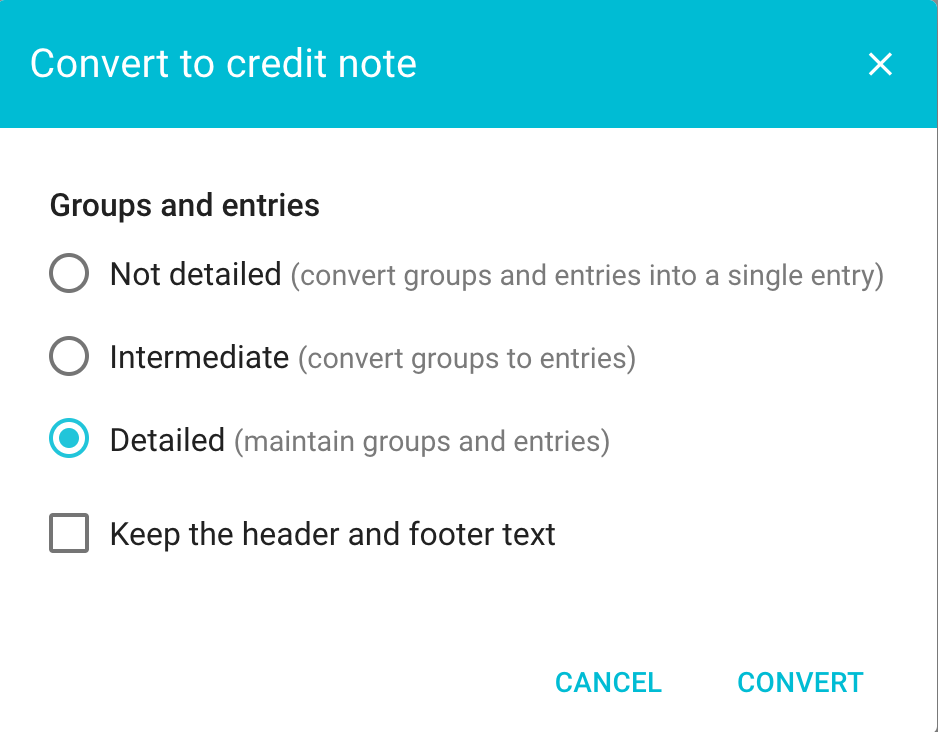
To create a credit note, go to the page listing all of your invoices, then click on the contextual menu Contextual menu for the invoice in question, then click “Convert to credit note” Convert to credit note icon.

The “Display linked invoices” button appearing on the page listing all invoices Button to display linked invoices allows you to show the original invoice and the credit note. This button appears automatically when a credit note exists.

All default settings for credit notes (such as the reference number format, text, etc.) can be found via the main menu in “Settings > Invoices”, then on the “Credit notes” tab.

Convert an invoice to a credit note

Link to this article: https://toolcie.com/en/support/k/how-do-i-create-credit-note
YouTube video

How do I install new layout templates for my quotes and invoices?

With Toolcie, you can install as many layout templates as you like. 15 ready-to-use templates are available to help you get started.

Once the layout template has been installed, you can modify it however you want.

You can install new templates using the menu:

  • Settings > Quotes > Layout template (dropdown list)
  • Settings > Invoices > Layout template (dropdown list)

You can also access these settings while in editing mode for a quote or invoice by clicking: Settings > Layout template (dropdown list).

Link to this article: https://toolcie.com/en/support/k/how-do-i-install-new-layout-templates-my-quotes-and-invoices
YouTube video

How do I customize a layout template for my quotes and invoices?

With Toolcie, you can fully customize layout templates for your quotes and invoices.

Among other things, you can modify the following:

  • fonts of text and titles
  • colors of the text, backgrounds, and borders
  • select the font size
  • change the location of page elements or hide them
  • select a background for the header and footer, and select an overall background pattern
  • select the exact location to display the customer’s address
  • add your logo and change its size
  • insert attachments before and after your documents to add a cover page or your company’s brochure
  • choose from over 14 ready-to-use templates
  • set distinct templates for your quotes and invoices
  • and much more.

You can customize your layout templates via the menu:

  • Settings > Quotes > Layout template (dropdown list)
  • Settings > Invoices > Layout template (dropdown list)

You can also access these settings while in editing mode for a quote or invoice by clicking: Settings > Layout template (dropdown list).

Link to this article: https://toolcie.com/en/support/k/how-do-i-customize-layout-template-my-quotes-and-invoices

How do I cancel an invoice?

From an accounting perspective, we recommend creating a credit note to cancel an invoice.

You can also consider an invoice to be canceled by marking it with the status “Canceled”.
If the invoice has already been paid, you can register a negative payment by selecting the “Refund” option from the “Payments” tab in the contextual menu Contextual menu located on the right of the page listing the invoices.

Link to this article: https://toolcie.com/en/support/k/how-do-i-cancel-invoice

How do I complete a bulk import and export of contacts?

Toolcie allows you to do a bulk import and export of your existing and prospective customers.

Before starting

Here is what you need to know before starting this process:

  • To carry out this process, you must use a spreadsheet in an application such as Microsoft Excel or Google Sheets, saved or exported as a comma-separated values (CSV) file.
    See how to do this with Microsoft Excel
  • Importing is limited to 500 entries. If you have more than 500 contacts, please import them in several batches.

Bulk importing contacts

To import new contacts, in the Contacts section, click on the import Import button button. When the dialog box opens, click on the link to download a sample file. Once you’ve filled in the file, import it using the upload button Upload button.

Bulk updating contacts

To update contacts, use the sample file described in the previous section or the export file from the next section.

The import process will determine if a new contact is being added or if an existing contact is being updated based on the following fields:

  • Company name
  • Zip/Postal code
  • Country

Bulk exporting contacts

To export contacts, in the Contacts section, check the Checkbox boxes for the contacts that you want to export, then click on the export button Export button.

Link to this article: https://toolcie.com/en/support/k/how-do-i-complete-bulk-import-and-export-contacts

Does Toolcie have an application?

Yes, Toolcie has an app for smartphones, tablets, and computers.

It is compatible with Windows, Mac, Android, iOS, Linux, and Chrome OS.

Download the app

Link to this article: https://toolcie.com/en/support/k/does-toolcie-have-application

How do I delete a company account?

You can delete a company account with all associated data (quotes, invoices, contacts, items, users, etc.) at any time.

To do so, go to “Settings > General”, then click on “Delete company account”.

Potential reason preventing deletion of your account:

If your company is domiciled in France and is subject to VAT fraud prevention law (Article 286 of the
French General Tax Code), you cannot delete your account unless it only contains non-finalized invoices.

Link to this article: https://toolcie.com/en/support/k/how-do-i-delete-company-account

How do I automatically add attachments to quotes and invoices?

Toolcie allows you to add attachments before and after the document. The attachments will be visible in the final PDF document, as well as online, with the “Share document” feature, for example.

Example uses:

  • add a cover page
  • add your company’s brochure
  • add general terms and conditions of sale
  • add additional information

How do I add an attachment?

To add an attachment, edit the layout template as follows:

  • Settings > Quotes > Layout template (dropdown list)
  • Settings > Invoices > Layout template (dropdown list)

Once in editing mode, click the “Attachments” tab located in the left-hand column, then import your attachments in PDF format.

How do I add different attachments to quotes and invoices?

If you want to add different attachments for quotes and invoices, duplicate the existing layout template. To do this, click on the contextual menu located in the bar at the top of the page.

Link to this article: https://toolcie.com/en/support/k/how-do-i-automatically-add-attachments-quotes-and-invoices

How do I automatically add an HTML signature to emails?

You can automatically add an HTML signature to the emails about quotes and invoices that you send out through Toolcie.

To do so, go to the personal settings of your account (link located on the upper right), then go to the “Signatures” tab.

Add your text to complete the field “Text signature for emails”.

For more advanced personalization, we recommend creating an image, then inserting it into the text field using the button “Insert media button Insert media” from the text editor.

Frequently asked questions

What should I do if the image I inserted looks too big ?

If this happens, use image editing software such as Photoshop or another online tool capable of resizing your image.

Link to this article: https://toolcie.com/en/support/k/how-do-i-automatically-add-html-signature-emails

How do I complete a bulk import and export of items?

Toolcie allows you to do a bulk import and export of your products and services.

Before starting

Here is what you need to know before starting this process:

  • To carry out this process, you must use a spreadsheet in an application such as Microsoft Excel or Google Sheets, saved or exported as a comma-separated values (CSV) file.
    See how to do this with Microsoft Excel
  • Importing is limited to 500 entries. If you have more than 500 items, please import them in several batches.

Bulk importing items

To import new products or services, in the items section, click on the import Import button button. When the dialog box opens, click on the link to download a sample file. Once you’ve filled in the file, import it using the upload button Upload button.

Bulk updating items

To update products or services, use the sample file described in the previous section or the export file from the next section.

The import process will determine if a new item is being added or if an existing item is being updated based on the following fields:

  • Reference
  • Barcode
  • Item name

Bulk exporting items

To export products or services, in the items section, check the Checkbox boxes for the items that you want to export, then click on the export Export button button.

Link to this article: https://toolcie.com/en/support/k/how-do-i-complete-bulk-import-and-export-items