How to cancel my subscription?
You can cancel your subscription at any time.
To do so, use the main menu "Settings > Subscription" and go to the "Settings" tab. Once in the settings, use the contextual menu
to cancel your subscription.
You can cancel your subscription at any time.
To do so, use the main menu "Settings > Subscription" and go to the "Settings" tab. Once in the settings, use the contextual menu
to cancel your subscription.
You can create bundles of items, also called bundles of products and services.
These bundles can be used in your quotes and invoices.
There are two ways of adding a bundle to a document:
These two actions are very different and must be understood before using them.
With this action, when adding a bundle to a quote or invoice, only the items in the bundle will be added. The bundle itself will not be added to the document. This action should be used to save time if you regularly have to add several of the same items to documents.
With this action, when the bundle is added to a document, it will appear as a single line item with the bundle and the items it contains. This action should be used if you want to offer a product or an item made up of sub-items. This type of bundle allows you to set a new price for the group of sub-items.
The bundle remains modifiable once added to the document.
The bundle only controls the tax on the bundle itself. As such, it is recommended that you only add items subject to the same tax to a bundle.
A bundle of items can be created the same way that a standard item is added. When creating the item, select the type “Bundle”, then select the items that make up the bundle.
At any time, you can manually change the statuses of your documents, including canceling an invoice, changing its status to sent, or adding confirmed status to a quote.
To do this, go to the page listing your documents, then click on the color-coded label indicating the document’s status. When you click on it, you can select a new status.

You can add or remove the units of measure of your choice directly in editing mode for a quote or invoice by clicking “Manage” at the bottom of the units list. You can also access this setting directly from the main menu “Settings > Units”.

Toolcie complies with VAT fraud prevention law (Article 286 of the
French General Tax Code).
The software complies with the four main criteria, which are:
The software automatically activates the feature to ensure compliance based on the following criteria:
The business owner must download the individual declaration and sign it to comply with the law. You can obtain this document via the user menu at the upper right of the software.

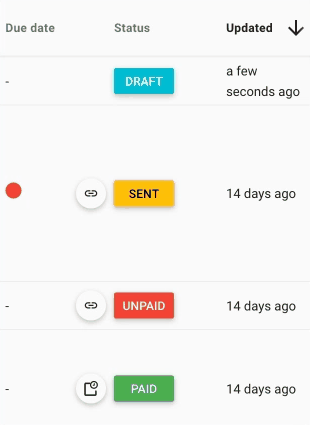
When an invoice is in “Sent” status, the due date automatically appears on the page listing all invoices in a visual format
.
When you hold the cursor over it, the number of days remaining before the due date appears. Toolcie sends an automatic notification to the invoice creator on the due date.
You can create an invoice reminder at any time to send to the customer. The invoice reminder feature creates a new “Reminder”-type invoice containing all of the information from the original invoice.
Once the reminder invoice has been sent, the original invoice status will move to “Unpaid”. The reminder invoice will then take its place. You can generate as many reminders as you like. Generating a reminder can be done via the original invoice or via a reminder invoice.
The “Display linked invoices” button appearing on the page listing all invoices
allows you to show the original invoice and the linked reminder invoices. This button automatically appears when invoices are linked together.
All default settings for reminders (such as fees, the due date, and text, particularly for email) can be found via the main menu in “Settings > Invoices”, then on the “Reminders” tab.
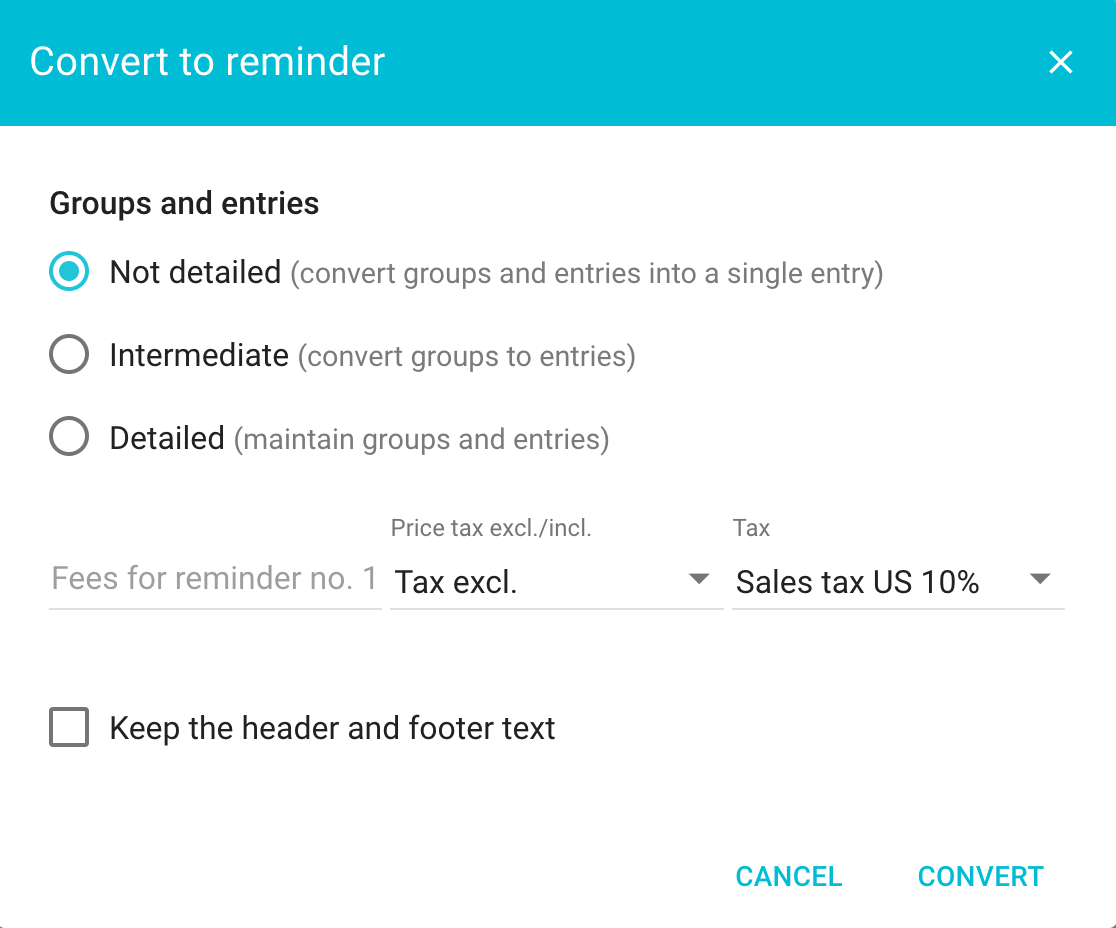
To convert an invoice to a reminder, on the page listing all invoices, click on the contextual menu located on the right
then click “Convert to reminder”
.
When converting, you can indicate reminder fees.

To create a credit note, go to the page listing all of your invoices, then click on the contextual menu
for the invoice in question, then click “Convert to credit note”
.
The “Display linked invoices” button appearing on the page listing all invoices
allows you to show the original invoice and the credit note. This button appears automatically when a credit note exists.
All default settings for credit notes (such as the reference number format, text, etc.) can be found via the main menu in “Settings > Invoices”, then on the “Credit notes” tab.

From an accounting perspective, we recommend creating a credit note to cancel an invoice.
You can also consider an invoice to be canceled by marking it with the status “Canceled”.
If the invoice has already been paid, you can register a negative payment by selecting the “Refund” option from the “Payments” tab in the contextual menu
located on the right of the page listing the invoices.
Yes, Toolcie has an app for smartphones, tablets, and computers.
It is compatible with Windows, Mac, Android, iOS, Linux, and Chrome OS.
Toolcie allows you to add attachments before and after the document. The attachments will be visible in the final PDF document, as well as online, with the “Share document” feature, for example.
Example uses:
To add an attachment, edit the layout template as follows:
Once in editing mode, click the “Attachments” tab located in the left-hand column, then import your attachments in PDF format.
If you want to add different attachments for quotes and invoices, duplicate the existing layout template. To do this, click on the contextual menu located in the bar at the top of the page.
You can automatically add an HTML signature to the emails about quotes and invoices that you send out through Toolcie.
To do so, go to the personal settings of your account (link located on the upper right), then go to the “Signatures” tab.
Add your text to complete the field “Text signature for emails”.
For more advanced personalization, we recommend creating an image, then inserting it into the text field using the button “
Insert media” from the text editor.
If this happens, use image editing software such as Photoshop or another online tool capable of resizing your image.
In Switzerland, “QR-bills” replaced the red and orange payment slips on June 30, 2020.
As a creditor, you can easily issue your invoices with Swiss QR Codes using Toolcie.
Before configuring Toolcie this way, you must already have a standard Swiss IBAN.
Once you have your IBAN, add a new payment method by going to “Settings > Payments”, then click on the button to add a new payment method
. Next, activate bank payment using the switch
and complete the IBAN field.
At this point, you have basically completed the configuration. You can create a new invoice and verify that the QR code does indeed appear. In draft mode (document not finalized), the QR code displayed is just an example. The final QR code will be automatically generated during document finalization (when downloading/printing the PDF or sharing the invoice).
If the Swiss QR code does not appear on your invoice, check the following points:
You can change the currency of a quote or invoice in editing mode by clicking on the contextual menu
then on the settings button. ![]()
You can also change this setting by default so that your new quotes and invoices will automatically be configured accordingly. To do this, go to the main menu “Settings > General”.
You can activate or deactivate the detailed display of taxes on quotes and invoices on a case-by-case basis by clicking on the contextual menu
then on the settings button. ![]()
You can also change this setting by default so that your new quotes and invoices will automatically be configured accordingly. To do this, go to the main menu “Settings > Quotes/Invoices”.
To access the invoices for your subscription, use the main menu “Settings > Subscription”, then go to the “Invoices” tab. There you will find all invoices for your subscription.
The text library allows you to create reusable text to save time later. You can insert text from the library when a text field has multiple lines.
When you click on the text field in the editing bar, the button
allows you to search for text from the library. The button
allows you to save the text being written to the library.
For quotes and invoices, you can also set your default text (header text, footer text, email text) by going to “Settings > Quotes” and “Settings > Invoices”.
You can also set various text signatures by going into your personal settings (the menu located on the upper right of the application), then to the “Signatures” tab.
Text types allow you to categorize pieces of text to find them more easily. Text types can also be used to display tokens (variables) that can be used based on the context. For example, the text type “Email for quotes” allows you to use tokens such as “Customer last name”, “Customer first name”, “Quote reference ID”, or “Quote amount”. These different tokens will be automatically replaced by the corresponding values for the document.
The document templates are used to boost productivity. They allow you to create quotes and invoices from a basic document that you’ve previously created.
When creating a new document, you have the choice to create a blank (clean) document or to start from an existing document template.
There are two options:
No, document templates should not be sent to customers. They are only to be used as templates for creating new documents.
You can automatically add text to the headers and footers of quotes and invoices when creating a new document. The text can then be edited in each document.
You can add this text from the main menu “Settings > Quotes”. Add your text to fill in the field entitled “Default footer text”.
Follow this same step for invoices using the main menu “Settings > Invoices”.
The text will then be automatically added when new documents are created. This action will not change your existing documents.
The document templates are used to boost productivity. They allow you to create quotes and invoices from a basic document that you’ve previously created.
Layout templates, on the other hand, are used to customize the appearance (i.e., the design) of your documents.
Related articles :
You can add one or more attachments when sending a quote or invoice.
You have three options to do so:
To import the attachment directly into the email, click on the
“Import an attachment” button.
Once the media library is open, select the desired media or import a new one.
To insert the attachment into the body of the email, click on the “Message” text field, then on the toolbar, click on the
“Insert media” icon.
Once the media library is open, select the desired media or import a new one.
The attachment will then be inserted as a link directly into the body of your email.
You can also save the message for later usage by clicking on the
“Save this text to the library” button located on the toolbar.
Toolcie allows you to add attachments before and after the document in PDF format.