Knowledge base

How do I create a recurring invoice?

Recurring invoices are useful when you bill some of your customers at regular intervals. For example, this can apply to subscriptions or maintenance.

Toolcie lets you create recurring invoices. The software automatically generates a new invoice based on the original template at regular intervals. Once the invoice has been created, the software sends you an alert so you can review it and, if everything is correct, send it to your customer.

Activate recurring invoicing

You can enable the recurring option for an existing invoice or when creating a new one.

While editing or creating an invoice, click the contextual menu Contextual menu then click the “Recurring invoice” Recurring invoice button button.
From the page listing all invoices, you can also use the contextual menu Contextual menu then click “Recurring invoice.”

The window will offer different options. In particular, you can set the desired frequency interval—for example: every two weeks, every three months, every year, etc.

You can also set how the recurrence ends:

  • never
  • end date
  • number of occurrences

If you choose an end date, the last automatic invoice will be created on or before that date.

If you set a number of occurrences, the last invoice will be created once that number is reached. For example: if you set two occurrences, two invoices will be created and then recurring invoicing will stop.

Once saved, the next invoice creation date will be displayed.

Edit or deactivate recurring invoicing

At any time, you can edit or deactivate a recurring invoice either from the original invoice or from subsequent related invoices. Just follow the same steps as when activating recurring invoicing.

View all recurring invoices

From the invoice list page, you can view recurring invoices (templates) by clicking the search icon Search icon and then, from the menu below the search field, selecting “Recurring invoice.”

Link to this article: https://toolcie.com/en/support/k/how-do-i-create-recurring-invoice
YouTube video

How do I customize a layout template for my quotes and invoices?

With Toolcie, you can fully customize layout templates for your quotes and invoices.

Among other things, you can customize the following:

  • fonts for text and titles
  • colors of text, backgrounds, and borders
  • font size
  • placement of page elements, or hide them
  • backgrounds for the header and footer, plus an overall background pattern
  • exact location of the customer’s address
  • your logo and its size
  • attachments before and after your documents, such as a cover page or your company brochure
  • more than 14 ready-to-use templates
  • distinct templates for your quotes and invoices
  • and much more.

You can customize your layout templates via the menu:

  • Settings > Quotes > Layout template (dropdown list)
  • Settings > Invoices > Layout template (dropdown list)

You can also access these settings while editing a quote or invoice by clicking: Settings > Layout template (dropdown list).

Link to this article: https://toolcie.com/en/support/k/how-do-i-customize-layout-template-my-quotes-and-invoices
YouTube video

How do I install new layout templates for my quotes and invoices?

With Toolcie, you can install as many layout templates as you like. 15 ready-to-use templates are available to help you get started.

Once a layout template has been installed, you can edit it however you want.

You can install new templates using the menu:

  • Settings > Quotes > Layout template (dropdown list)
  • Settings > Invoices > Layout template (dropdown list)

You can also access these settings while editing a quote or invoice by clicking: Settings > Layout template (dropdown list).

Link to this article: https://toolcie.com/en/support/k/how-do-i-install-new-layout-templates-my-quotes-and-invoices

How do I edit an invoice or quote that’s been finalized?

A document with a status other than “Draft” cannot be edited.

However, you can change the status back to “Draft” by clicking the current status, then selecting “Draft.” Once this is done, you’ll be able to edit the document again.

Note that companies subject to France’s VAT fraud prevention law cannot edit an invoice once it’s finalized.
In that case, you can cancel the invoice and then create a new one by duplicating the old invoice using the contextual menu Contextual menu located to the right on the invoice list page.

Change status to draft mode

Link to this article: https://toolcie.com/en/support/k/how-do-i-edit-invoice-or-quote-thats-been-finalized
YouTube video

Edit an item on a quote or invoice

Edit an item on a quote or invoice

When you add a product or service to a quote or invoice, you can edit it at any time.

There are two ways to edit an item:

  1. On the document itself
  2. In the item database

Editing the item on the document itself lets you change fields such as price, discount, name, description, or unit without affecting the item in the database.

Editing an item in the database, on the other hand, updates the item both in the database and on any documents that use it. As a result, this will also affect other documents that are not yet finalized.

To edit a product or service on a document or in the database, click the contextual menu Contextual menu to the right of the line item.

You can reset an edit at any time in a document by clicking the reset button for the field Reset product button.

Link to this article: https://toolcie.com/en/support/k/edit-item-quote-or-invoice

How do I change the reference numbers of quotes and invoices?

To change the format of the reference number for future quotes and invoices, go to Settings > Quotes/Invoices from the main menu.

In the Reference number format field, you can edit how reference numbers are generated. Use tokens that will be replaced by the correct values (for example: Reference ID, day, month, year, etc.). A preview of the final result is shown just below the field.

You can also choose whether reference numbers reset monthly, yearly, or never.

Both annual and monthly resets require a reference number format that includes the [year] token, and monthly resets must also include the [month] token.

To edit the reference of a specific quote or invoice, open the document and click the contextual menu Contextual menu then the settings button Settings button.

If your company is subject to France’s VAT fraud prevention law, you cannot edit the reference number format for invoices. If necessary, please create a ticket via the support center and we will make the change for you.

Link to this article: https://toolcie.com/en/support/k/how-do-i-change-reference-numbers-quotes-and-invoices

How to accept installment payments?

Installment payment, also known as "Buy now, pay later", is a payment method that allows merchants to sell their products to customers who wish to pay in multiple installments. This option enables your business to receive the full payment immediately, while your customer pays only a portion or nothing at all at the time of purchase. The process is 100% automated. Payment collection and invoice status change are done automatically.

Supported solutions

Several installment payment solutions are supported by our invoicing software, Toolcie, including:

  • Klarna
  • Afterpay / Clearpay
  • Affirm

Note that "Buy now, pay later" methods offered are only supported for consumers and not for businesses.

How it works

The customer receives the invoice and fills in their information online. Once the payment is made, the customer is notified by email, and a notification is sent to the business.

How to activate this payment method

Here are the steps to activate "Buy now, pay later" on Toolcie:

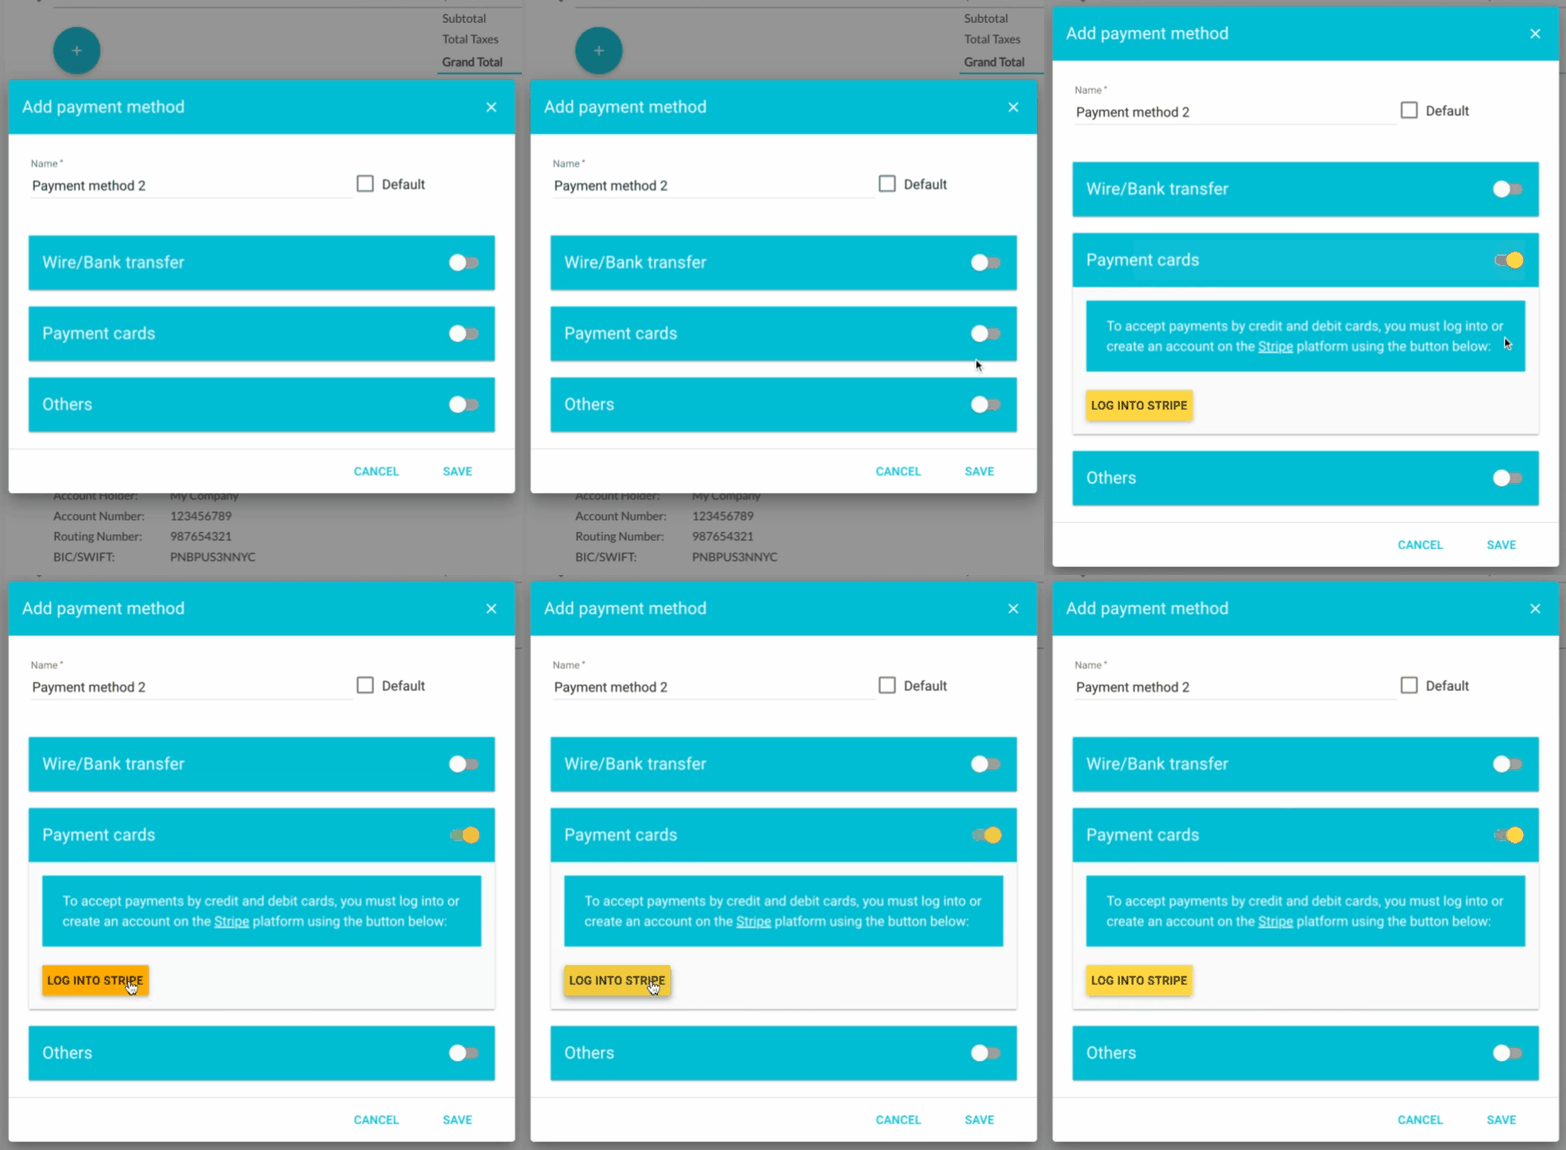
  1. Add or edit your current payment method from your invoice in edit mode.
  2. Enable the "Online Payment" mode.
  3. This setting is also available from the main menu "Settings > Payment methods".
  4. When activated, you will need to sign in or create an account with Stripe, our payment partner.
  5. Once your Stripe account is connected, you can activate the desired payment method, such as Klarna, Afterpay, through your Stripe account.

How to send the invoice to the customer

Once the payment method is updated, you can send the invoice to the customer via email through the application. The email will contain the direct link for online payment. You can also retrieve this payment link by sharing the invoice or copying the link displayed in the invoice under the "Payment Information" section.

How to verify that the payment method is activated

If the Stripe payment method is properly configured and activated, you should see the "Pay" button.

Link to this article: https://toolcie.com/en/support/k/how-accept-installment-payments

How do I accept payments by payment card?

You can give your customers the option to pay you directly online by payment card. To do so, while in editing mode for your invoice, add or edit the selected payment method, activating “Online payment”.

This setting is also available from the main menu “Settings > Payment methods”.

Payment card activation

Once the payment method has been updated, you can send the invoice to the customer by email through the application. The email will contain the direct link for online payment. You can also get this payment link by sharing the invoice or by copying the link displayed on the invoice in the “Payment information” section.

If the Stripe payment method is properly configured and activated, you should see the “Pay” button Pay online button appear.

Link to this article: https://toolcie.com/en/support/k/how-do-i-accept-payments-payment-card

How to accept online bank transfer payments?

The advantages of online bank transfer payments

Toolcie allows its users to accept online bank transfer payments through an integration with Stripe, an online payment platform. This payment method offers several advantages:

  • Customers or businesses can use bank transfers to send money directly to your bank account.
  • This payment method is frequently used for high-value inter-business payments.
  • The process is 100% automated, which means payment collection and invoice status changes happen automatically.

Supported bank transfer solutions

Toolcie supports several bank transfer solutions, including:

  • SEPA Bank Transfer for the European Union
  • ACH Bank Transfer for the United States and Canada
  • UK Bank Transfer for England
  • Sofort for the European Union
  • Bancontact for Belgium
  • iDEAL for the Netherlands

Other solutions can be added based on users' needs.

How to enable online bank transfer payment

To enable online bank transfer payment with Toolcie, follow these steps:

  1. Add or edit your current payment method from your invoice in edit mode.
  2. Enable "Online Payment" mode. This setting is also available from the main menu "Settings > Payment methods".
  3. Upon activation, you'll need to sign in or create an account with Stripe, our payment partner.
  4. Once your Stripe account is connected, you can enable the desired payment method, such as SEPA or ACH, through your Stripe account.

How to send the invoice to the customer

Once the payment method is enabled, you can send the invoice to the customer via email through the application. The email will contain the direct link for online payment. You can also retrieve this payment link by sharing the invoice or copying the link displayed in the invoice under the "Payment Information" section.

Verifying payment mode activation

Once the Stripe payment method is properly configured and enabled, you should see the "Pay" button appear on the invoice. The customer can click this button to make the online bank transfer payment.

It's important to note that bank transfers may take a few business days to process, and processing times may vary depending on the banks involved. You'll need to wait a few days for the payment to be collected in your bank account.

In conclusion, accepting online bank transfer payments is a quick and convenient payment method for customers and businesses. With Toolcie, you can easily enable this payment method and send invoices to your customers for quick and automatic collection. Don't forget to verify that your Stripe account is properly configured to accept bank transfers and inform your customers of this convenient payment option.

Link to this article: https://toolcie.com/en/support/k/how-accept-online-bank-transfer-payments

Understanding the operation of quote and invoice numbering

Operation

Toolcie manages document numbering differently in draft and final modes.

When you create a new document, a provisional reference number is assigned.

Once the document is finalized (status change, sending, downloading, etc.), the definitive reference is generated.

How to edit numbering?

You can edit the numbering for quotes and invoices that will be created in the future.

You can also edit the numbering individually for each document.

How to edit the reference number?

When is the definitive reference generated?

The definitive reference is generated when the document’s status changes to anything other than "Draft."

How to get the definitive reference?

You can get the definitive reference of a document by performing one of the following actions:

Link to this article: https://toolcie.com/en/support/k/understanding-operation-quote-and-invoice-numbering

How do I create a deposit or balance invoice from a quote?

Toolcie allows you to create invoices from a quote. Invoices can be for deposits, balances, or totals.

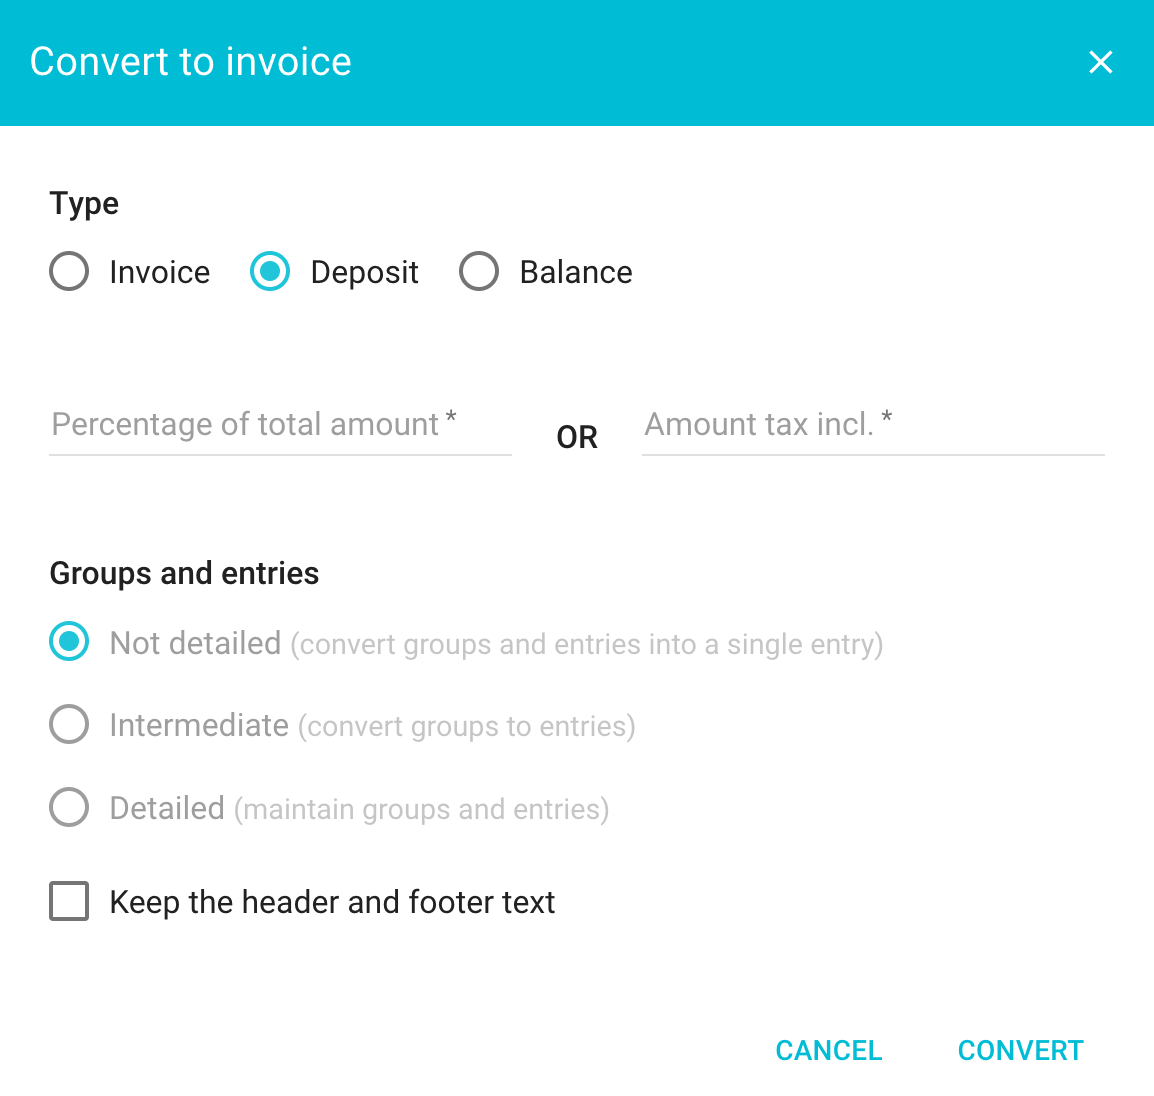
To do this, go to the page listing all quotes and estimates, then click on the contextual menu located on the right Contextual menu then click “Convert to invoice” Convert a quote to an invoice.

When converting a quote to a deposit or balance invoice, you must indicate the percentage of the total amount or the desired total amount including tax.

Convert a quote into a deposit, balance or total invoice

Link to this article: https://toolcie.com/en/support/k/how-do-i-create-deposit-or-balance-invoice-quote

Should I list prices excluding tax or including tax?

We are often asked whether prices should be entered excluding tax or including tax, typically for products or services.

The most important thing to consider is what happens if the tax (e.g., VAT) rate changes. Will your products and services need to increase in price, or should they stay at the same price (decreasing or increasing revenue depending on the new tax rate)?

Another point to consider is rounding linked to the currency used. For example, in Switzerland, amounts are rounded to the nearest 0.05. If you’ve activated the option to display tax-inclusive prices, we recommend entering your prices including tax to avoid rounding issues.

How do I specify this information?

The software lets you specify whether the price is shown excluding tax (“Excl. tax”) or including tax (“Incl. tax”) for each of your products and services.

What happens if the tax rate changes?

If the tax rate (e.g., VAT or sales tax) changes, just change the rate. Item prices are automatically recalculated using the new rate, with the selected price display mode determining the inverse calculation (excluding tax → including tax, or including tax → excluding tax).

This will not affect your previously finalized quotes and invoices (finalized documents).

Link to this article: https://toolcie.com/en/support/k/should-i-list-prices-excluding-tax-or-including-tax
YouTube video

Calculating margins and managing costs

Toolcie lets you assign costs to each line item on your quotes and invoices. These costs reflect your expenses. For example, for a product, the cost might be the tax-excluded purchase price, packaging costs, or delivery costs.

Assigning costs lets the software automatically calculate the margin and its margin rate. In Toolcie, margin equals the pre-tax total minus costs. The margin rate is the percentage of margin relative to the pre-tax total (often called the gross margin rate).

How do I assign the cost for a product or a custom line item?

To assign the cost or calculate the margin for a product, service, or custom line item, check the “Checkbox Calculate margin” box when adding or editing the line item.

You can complete the “Cost” field and the “Margin %” field. The “Price”, “Cost”, and “Margin %” fields are linked. Completing any two of these fields will automatically fill the third.

You can link or unlink the “Price” and “Cost” fields by clicking the button on the right Button to link price and cost. When the two fields are linked, any change to one will automatically update the other based on the margin rate.
This setting is just an input aid. It is not saved to the database.

Managing fees and costs

When creating quotes and invoices, you can add fees that are visible to the customer. By default, the software treats these fees as costs, so they reduce the margin.

For each fee, you can indicate that it should be treated as income by checking the “Checkbox Treat as income” box. When checked, the fee is considered to have a 100% margin.

An additional checkbox, “Checkbox Cost”, lets you assign the cost associated with the fee. The cost can be set as a percentage or as a fixed amount.

Displaying the margin and margin rate

The margin and margin rate are shown on quotes and invoices in editing mode for each line item. The overall margin appears below the total for each group.

The margin also appears on the pages listing all documents, as well as on the Toolcie dashboard. You can also see the total margin earned per customer and per product.

Link to this article: https://toolcie.com/en/support/k/calculating-margins-and-managing-costs

How do I complete a bulk import and export of contacts?

Toolcie allows you to do a bulk import and export of your existing and prospective customers.

Before starting

Here is what you need to know before starting this process:

  • To carry out this process, you must use a spreadsheet in an application such as Microsoft Excel or Google Sheets, saved or exported as a comma-separated values (CSV) file.
    See how to do this with Microsoft Excel
  • Importing is limited to 500 lines. If you have more than 500 contacts, please import them in several batches.

Bulk importing contacts

To import new contacts, in the Contacts section, click on the import Import button button. When the dialog box opens, click on the link to download a sample file. Once you’ve filled in the file, import it using the upload button Upload button.

Bulk updating contacts

To update contacts, use the sample file described in the previous section or the export file from the next section.

The import process will determine if a new contact is being added or if an existing contact is being updated based on the following fields:

  • Company name
  • Zip/Postal code
  • Country

Bulk exporting contacts

To export contacts, in the Contacts section, check the Checkbox boxes for the contacts that you want to export, then click on the export button Export button.

Fixing CSV file display issues

If your CSV file appears broken or incorrectly formatted when opened, it may be due to an incorrect column separator or encoding. Here are some checks to perform:

  • Column separator: Make sure your spreadsheet software uses a comma (",") as the separator instead of a semicolon (";").
    - In Excel, open the CSV file directly. If the columns are not correctly separated, use the "Text to Columns" function in the Data tab and select Comma as the delimiter.
    - In Google Sheets, when opening the file, select Comma as the separator in the import options.
  • File encoding: The CSV file is saved in UTF-8 to ensure compatibility with special characters.
    - If some characters do not display correctly, check that your spreadsheet software is opening the file using UTF-8 encoding.
    - In Excel, use "Open" and select "UTF-8 Encoding" if prompted.
    - In Google Sheets, UTF-8 encoding is automatically supported when opening the file.
  • Quick check: If the data does not display correctly, you can open the CSV file with a text editor (Notepad++, VS Code…) to verify that it is encoded in UTF-8 and that the columns are separated by commas.

If issues persist, try opening your file with a different spreadsheet application or using an online conversion tool.

For more information on opening CSV files in Excel, check the official Microsoft documentation: View Microsoft documentation .

Link to this article: https://toolcie.com/en/support/k/how-do-i-complete-bulk-import-and-export-contacts

How do I complete a bulk import and export of items?

Toolcie allows you to do a bulk import and export of your products and services.

Before starting

Here is what you need to know before starting this process:

  • To carry out this process, you must use a spreadsheet in an application such as Microsoft Excel or Google Sheets, saved or exported as a comma-separated values (CSV) file.
    See how to do this with Microsoft Excel
  • Importing is limited to 500 lines. If you have more than 500 items, please import them in several batches.

Bulk importing items

To import new products or services, in the items section, click on the import Import button button. When the dialog box opens, click on the link to download a sample file. Once you’ve filled in the file, import it using the upload button Upload button.

Bulk updating items

To update products or services, use the sample file described in the previous section or the export file from the next section.

The import process will determine if a new item is being added or if an existing item is being updated based on the following fields:

  • Reference
  • Barcode
  • Item name

Bulk exporting items

To export products or services, in the items section, check the Checkbox boxes for the items that you want to export, then click on the export Export button button.

Fixing CSV file display issues

If your CSV file appears broken or incorrectly formatted when opened, it may be due to an incorrect column separator or encoding. Here are some checks to perform:

  • Column separator: Make sure your spreadsheet software uses a comma (",") as the separator instead of a semicolon (";").
    - In Excel, open the CSV file directly. If the columns are not correctly separated, use the "Text to Columns" function in the Data tab and select Comma as the delimiter.
    - In Google Sheets, when opening the file, select Comma as the separator in the import options.
  • File encoding: The CSV file is saved in UTF-8 to ensure compatibility with special characters.
    - If some characters do not display correctly, check that your spreadsheet software is opening the file using UTF-8 encoding.
    - In Excel, use "Open" and select "UTF-8 Encoding" if prompted.
    - In Google Sheets, UTF-8 encoding is automatically supported when opening the file.
  • Quick check: If the data does not display correctly, you can open the CSV file with a text editor (Notepad++, VS Code…) to verify that it is encoded in UTF-8 and that the columns are separated by commas.

If issues persist, try opening your file with a different spreadsheet application or using an online conversion tool.

For more information on opening CSV files in Excel, check the official Microsoft documentation: View Microsoft documentation .

Link to this article: https://toolcie.com/en/support/k/how-do-i-complete-bulk-import-and-export-items

Why is the total amount including tax not displayed?

If your quote or invoice does not show the total amount including tax, check the following points:

1. Enable tax management at the application level

Make sure you have enabled tax management via the main menu: "Settings > Taxes".

Once enabled, add at least one tax.

2. Enable tax management at the document level

Verify that you have enabled tax management in your quote or invoice.

To do this, in document editing mode, open the contextual menu Contextual Menu and then click the "Settings" button Settings Button .

3. Verify line items in the document

Verify that your line items (for example, catalog products or services and custom line items) have a tax assigned.

Link to this article: https://toolcie.com/en/support/k/why-total-amount-including-tax-not-displayed

Managing discounts on quotes and invoices

Toolcie allows you to manage discounts and other price reductions on your quotes and invoices in several different ways.

You can add discounts per line item, or to groups of line items (overall discounts).

A discount always includes two fields:

  • the discount type: percentage or fixed amount
  • the discount value

How do I add a discount to a line item?

To add a discount when creating a line item, click the Checkbox “Discount” checkbox, then complete the fields described above.

For a line item that’s already been created, open the contextual menu Contextual menu to add the discount.

How do I add a discount to a group of line items?

If you want to add an overall discount or a discount to a group of line items, click the “Add” Add button button, then click the “Discount” Discount button button.

If you want to apply a discount to the document total after taxes, choose the “Fixed amount” discount type, then select “Incl. tax” from the dropdown.

You can also apply the discount at a specific position (e.g., after a subtotal or within a subgroup). To do this, use the “Apply to the line items subtotal” Toggle button toggle to deactivate the option. Once the discount is inserted, drag and drop it to the desired position.

Link to this article: https://toolcie.com/en/support/k/managing-discounts-quotes-and-invoices

How do I show prices including tax or excluding tax?

Toolcie allows you to display the prices appearing on your quotes and invoices including tax or excluding tax.

You can establish this setting for all new documents, but you can also change it for each document.

Configuration for new documents

In the main menu “Settings > Invoices”, activate the option “Show tax-inclusive prices”.

Configuration for individual documents

When editing a quote or invoice, click on the contextual menu Contextual menu then on the “Configure” button. Settings button

You can then activate the option “Show tax-inclusive prices”.

Link to this article: https://toolcie.com/en/support/k/how-do-i-show-prices-including-tax-or-excluding-tax

Best practices to improve your email deliverability

Email deliverability is a key factor in ensuring that your quotes, invoices, and other communications reach your clients properly. Here are some best practices to follow to optimize message delivery.

1. Choose the right sending provider

By default, emails sent via Toolcie are dispatched from the address [email protected], with your own email address as the reply-to. While this setup works, it may limit deliverability depending on the recipient's email provider.

For better performance, it is highly recommended to use another email sending provider. Two options are available in Toolcie:

  • Google (Gmail) – by connecting your Gmail account, emails are sent directly from your own address.
  • Advanced mode (SMTP) – this mode allows you to configure a custom SMTP server (e.g., Google Workspace, Outlook 365, Zoho, OVH, IONOS, etc.).

To learn how to set up your email sending provider, see the article: How to configure your email sending provider.

2. Be careful with attachments and links

When sending a quote or invoice, Toolcie allows you to:

  • attach the document in PDF format;
  • add a sharing link using a secure token.

To improve deliverability, it is recommended to use only one of these methods to share the document. Emails that include both an attachment and a link can be flagged as suspicious by some spam filters.

3. Monitor bounces and sending errors

If there is an issue when sending an email (nonexistent address, autoresponder, complaint, etc.), Toolcie automatically forwards the bounce message to your email address. This allows you to be quickly informed and take action if necessary (for example, correct an invalid email address).

By applying these best practices, you maximize your chances of ensuring your communications are successfully delivered to their recipients.

Link to this article: https://toolcie.com/en/support/k/best-practices-improve-your-email-deliverability

How to set up your email sending provider

Toolcie allows you to send your quotes, invoices, and other emails using different email providers. This guide explains how to choose and configure the sending method that best suits your needs.

1. Accessing the sending settings

To configure your email sending provider, click on your name or profile picture at the top right of the app, then select:

Personal Settings > Email Sending

Sending settings are user-specific. If multiple people use the same Toolcie account, each person will need to configure their own sending method.

2. Available sending methods

Toolcie offers several sending options:

Toolcie (default)

By default, emails are sent through Toolcie’s servers. In this case:

No setup is required to use this method. However, deliverability may not be as optimal as when using your own provider.

Google (Gmail)

This option allows you to send emails from your own Gmail account, which significantly improves deliverability and builds trust with your recipients.

To enable this method:

  1. Click the “Log in with Google” button
  2. Follow the login steps and authorize Toolcie to send emails on your behalf
  3. Once connected, your Gmail address will appear as the sender

You can revoke access at any time from your Google account settings.

Advanced mode (SMTP)

This method lets you use a custom SMTP server (e.g., Google Workspace, Outlook 365, Zoho, OVH, IONOS, etc.). It’s ideal if you use a professional domain.

To configure SMTP sending, you will need to provide the following information:

  • Username (email address or login ID)
  • Password associated with the account
  • Host name (e.g., smtp.your-domain.com)
  • Port (commonly 465 for SSL, 587 for TLS)
  • Encryption: None, SSL, or TLS

Don’t hesitate to contact your email provider to obtain this information.

After entering the details, click the “Test this configuration” button. A test email will be sent to your own address. Once received, click “Confirm” to activate SMTP sending.

3. If you run into any issues

If you're experiencing connection or sending issues, double-check the information you provided (especially the password or port) or contact your email provider’s support.

You can also read our article: Best practices to improve email deliverability.

Link to this article: https://toolcie.com/en/support/k/how-set-your-email-sending-provider

Understanding the dashboard

The dashboard displays various information related to your account over a selected period of time, such as the progress of quotes and invoices, best customers, and more.

How quote and invoice status changes are handled

The statuses "Sent", "Rejected", "Accepted", and "Unpaid" are based on the date when the status was changed.

The "Paid" status is based on the date when one or more payments were received.

When a status changes, the amount assigned to the previous status remains visible in the graph. For example, if an invoice for $1,000 was marked as "Sent" on 02/01/2025 and then marked as "Paid" on 03/30/2025, the graph will show $1,000 under the "Sent" status on 02/01/2025 and $1,000 under the "Paid" status on 03/30/2025.

Currency conversion

The dashboard automatically converts amounts in currencies other than your default account currency using the exchange rate of the day when the data is displayed (not the rate at the time the status was updated).

Can the dashboard be used for accounting or to obtain accurate values?

No. Because of exchange rate conversions at the time of display and the way amounts remain fixed across statuses, it is not recommended to use these figures for accounting or precise analysis.

To get accurate figures for your invoices, we recommend using the "Revenue and taxes" feature, available from the invoice listing page by clicking the corresponding button Revenue and taxes.

You can also export your quotes and invoices to a spreadsheet (Google Sheets, Microsoft Excel, etc.) to perform your own calculations.

Link to this article: https://toolcie.com/en/support/k/understanding-dashboard

How do I delete a company account?

You can delete a company account with all associated data (quotes, invoices, contacts, items, users, etc.) at any time.

To do so, go to “Settings > General”, then click on “Delete company account”.

Potential reason preventing deletion of your account:

If your company is domiciled in France and is subject to VAT fraud prevention law (Article 286 of the
French General Tax Code), you cannot delete your account unless it only contains non-finalized invoices.

In this case, you can cancel your subscription to stop using the service, while still retaining access to your data in accordance with legal requirements.

Link to this article: https://toolcie.com/en/support/k/how-do-i-delete-company-account

Subscribing to a plan with bank debit

You can subscribe to a Toolcie plan using a delayed payment method, such as bank debit.

⚠️ Your subscription is activated only once the payment has been received.

Processing times depending on the payment method:

  • SEPA Direct Debit: between 3 and 6 business days
  • ACH Direct Debit (USA): between 2 and 5 business days

What if my subscription expires before the payment is processed?

If you've renewed your subscription or subscribed to a new plan using a delayed payment method, your previous subscription may expire before the new payment is processed, resulting in a temporary service interruption.

Here’s what you can do:

  1. Temporarily switch to the free plan, if your account is eligible, while your payment is being processed.
  2. Wait until the payment has been successfully processed.
    Once confirmed, Toolcie will automatically activate your subscription and notify you.
    No action is required from you or your bank during this period.

How can I change my payment method?

You can change or add a payment method at any time from the main menu: "Settings > Subscription" and go to the "Settings" tab.

⚠️ Please note: Changes to your payment method will only apply to future payments. They will not affect any debit already in progress.

Can Toolcie cancel a debit that’s already in progress?

No. Once a debit is initiated, Toolcie cannot cancel it. The process is managed directly between our payment provider (Stripe) and your bank.

Does Toolcie inform clients about payment delays?

Yes. Before subscribing, Toolcie clearly informs customers about:

  • The processing times for delayed payment methods
  • The risk of service interruption if the payment hasn't cleared by the subscription renewal date
Link to this article: https://toolcie.com/en/support/k/subscribing-plan-bank-debit

How do I do a bulk export with invoices or quotes?

Toolcie allows you to do a bulk export of your invoices or quotes.

To export invoices or quotes, in the corresponding section, check the boxes Checkbox for the documents that you want to export, then click on the export button Export button.

If you exported to CSV format, you must open the file in a spreadsheet program like Microsoft Excel or Google Sheets as a comma-separated values (CSV) file.

Fixing CSV file display issues

If your CSV file appears broken or incorrectly formatted when opened, it may be due to an incorrect column separator or encoding. Here are some checks to perform:

  • Column separator: Make sure your spreadsheet software uses a comma (",") as the separator instead of a semicolon (";").
    - In Excel, open the CSV file directly. If the columns are not correctly separated, use the "Text to Columns" function in the Data tab and select Comma as the delimiter.
    - In Google Sheets, when opening the file, select Comma as the separator in the import options.
  • File encoding: The CSV file is saved in UTF-8 to ensure compatibility with special characters.
    - If some characters do not display correctly, check that your spreadsheet software is opening the file using UTF-8 encoding.
    - In Excel, use "Open" and select "UTF-8 Encoding" if prompted.
    - In Google Sheets, UTF-8 encoding is automatically supported when opening the file.
  • Quick check: If the data does not display correctly, you can open the CSV file with a text editor (Notepad++, VS Code…) to verify that it is encoded in UTF-8 and that the columns are separated by commas.

If issues persist, try opening your file with a different spreadsheet application or using an online conversion tool.

For more information on opening CSV files in Excel, check the official Microsoft documentation: View Microsoft documentation .

Link to this article: https://toolcie.com/en/support/k/how-do-i-do-bulk-export-invoices-or-quotes

Why can't I find my quotes, invoices, contacts, or items anymore?

Sometimes, you may no longer find certain documents like your quotes, invoices, contacts, or items.

Here are the 5 possible reasons:

  1. An email address can be associated with multiple accounts. Please check by clicking on the Companies "Companies" icon at the top right of the application to see if you belong to multiple accounts. If so, click on the correct company to switch accounts.
  2. You may have created multiple accounts with different email addresses. If that's the case, please log out and use the correct email address. If needed, you can reset your password.
  3. If you have changed the document sorting order, it might make finding them more difficult. To fix this, ensure that the default sorting is in ascending order on a column such as the creation date or modification date. You can use the Up/Down "Up/Down" arrow, visible to the right of the column name when hovering over it, to reorder the display.
  4. A user of the account may have intentionally or accidentally deleted some data. Unfortunately, in this case, it cannot be restored.
  5. A user of the account may have intentionally or unintentionally deleted the account. Unfortunately, in this case, it cannot be restored. However, if the deletion was performed by another user of the account, an email is sent to the other users to notify them.
Link to this article: https://toolcie.com/en/support/k/why-cant-i-find-my-quotes-invoices-contacts-or-items-anymore

Why is reCaptcha asking me to complete a puzzle too often?

reCaptcha, developed by Google, is an essential tool to protect websites and applications from suspicious activities performed by robots or automated bots. Toolcie uses the invisible version of reCaptcha, which aims to make the user experience smoother by avoiding users to fill out forms or check boxes. However, some users may encounter issues where reCaptcha frequently asks them to complete a puzzle. In this article, we will explore the possible causes of this behavior and provide solutions to minimize these repetitive requests.

1. Use of VPN or Proxies

The use of VPN or proxies can be one of the main reasons why reCaptcha frequently asks to complete a puzzle. These tools modify the user's IP address, which can be interpreted as suspicious activity by reCaptcha. If you are using a VPN or proxy, try temporarily disabling them to see if it resolves the issue.

2. Suspicious Browsing History or Previous Activities

reCaptcha relies on various factors to determine if a user is a human or a bot. If your browsing history is considered suspicious or if you have performed suspicious activities on other websites and applications, reCaptcha may be more strict in asking you to complete a puzzle frequently. Also, avoid clearing your browsing history too frequently or using private browsing sessions as it can prevent reCaptcha from having the necessary information to evaluate your activity and may result in repetitive requests to complete a puzzle. In such cases, ensure that your browsing history is clean by avoiding visiting malicious websites or using suspicious browser extensions.

3. Rapid or Unusual Browsing Activity

If you are navigating quickly through the application or if your browsing actions are deemed unusual, reCaptcha may ask you more frequently to complete a puzzle to confirm that you are a legitimate user. Try to navigate in a more regular manner and avoid excessive or rapid clicking.

4. Blocking cookies, scripts, or ad blockers

Cookies, scripts, and ad blockers can also have an impact on the functioning of reCaptcha. If you have blocked cookies, scripts, or have an ad blocker enabled in your browser settings, it may result in frequent requests to complete a puzzle. Ensure that cookies and scripts are enabled for the Toolcie application to facilitate reCaptcha validation.

Additionally, if you are using an ad blocker, it may interfere with the elements necessary for the proper functioning of reCaptcha. In such cases, you can try temporarily disabling your ad blocker to see if it resolves the issue.

5. Try using a different browser or device

If you are still experiencing issues with reCaptcha, and the previously mentioned solutions haven't resolved the problem, you can try using a different web browser or device. Sometimes, specific browser configurations or extensions can interfere with the functioning of reCaptcha. By using a different browser or trying with another device, you can determine if the problem is related to a specific configuration of your browser or device. This can help you identify the source of the problem and find an appropriate solution.

Link to this article: https://toolcie.com/en/support/k/why-recaptcha-asking-me-complete-puzzle-too-often

How to cancel my subscription?

You can cancel your subscription at any time.

To do so, use the main menu "Settings > Subscription" and go to the "Settings" tab. Once in the settings, use the contextual menu Contextual menu to cancel your subscription.

Link to this article: https://toolcie.com/en/support/k/how-cancel-my-subscription
YouTube video

How bundles of items work

You can create bundles of items, also called bundles of products and services.

These bundles can be used in your quotes and invoices.

There are two ways of adding a bundle to a document:

  • Inserting just the bundle’s items
  • Inserting the bundle with its items

These two actions are very different and must be understood before using them.

Inserting just the bundle’s items

With this action, when adding a bundle to a quote or invoice, only the items in the bundle will be added. The bundle itself will not be added to the document. This action should be used to save time if you regularly have to add several of the same items to documents.

Inserting the bundle with its items

With this action, when the bundle is added to a document, it will appear as a single line item with the bundle and the items it contains. This action should be used if you want to offer a product or an item made up of sub-items. This type of bundle allows you to set a new price for the group of sub-items.

The bundle remains modifiable once added to the document. 

The bundle only controls the tax on the bundle itself. As such, it is recommended that you only add items subject to the same tax to a bundle.

Creating a bundle of items

A bundle of items can be created the same way that a standard item is added. When creating the item, select the type “Bundle”, then select the items that make up the bundle.

Link to this article: https://toolcie.com/en/support/k/how-bundles-items-work

How do I change the status of an invoice or quote?

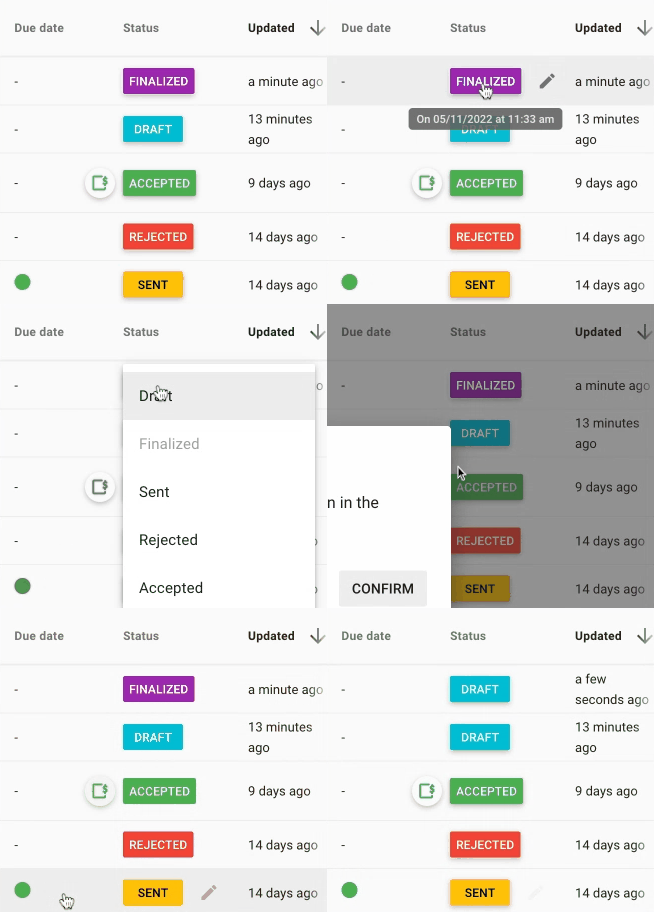
At any time, you can manually change the statuses of your documents, including canceling an invoice, changing its status to sent, or adding confirmed status to a quote.

To do this, go to the page listing your documents, then click on the color-coded label indicating the document’s status. When you click on it, you can select a new status.

Change the status of an invoice or quote

Link to this article: https://toolcie.com/en/support/k/how-do-i-change-status-invoice-or-quote